Search This Blog

Saturday, October 26, 2013

Paper Storage Rack

I volunteer in a kindergarten class one day a week.  The teacher switched to a new school this year, so we've been doing a lot of organizing to make things work more efficiently. I wanted to have some type of paper storage unit for colored paper so we could grab what we needed without pulling out every other color. 
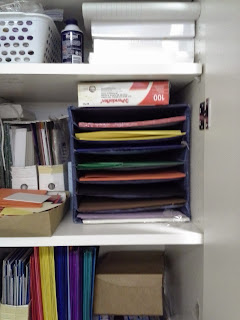
Most racks that are for purchase, are ridiculously priced, so I pulled out a piece of fabric that I'd had around for awhile, and got to creating.

You'll need 3-4 sheets of foam board to hold the shape of the box
3-4 yards of cotton fabric
3 buttons
7 sheets of corrugated  cardboard to support the shelves
thread
sewing machine
fabric marker

I didn't think to take photos while I was creating, so I'll try to explain how I made my paper rack.
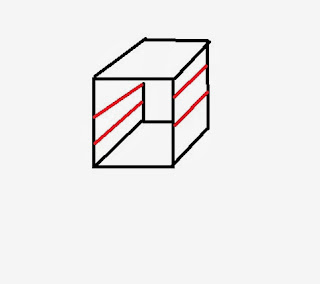
The top, bottom and sides and back are all the same size.  I used a large sheet of colored paper as my guide and wanted to make the shelves 1 inch wider and 1 inch longer than the paper so I cut the fabric 13 x 19.  I cut 15 pieces 13 x 19.  I also cut 16 strips (2 x 19) to sew between the shelves.  The seams for these are represented by the red lines in the box above.

Serge the shorter sides of 7 shelves for a cleaner finish before beginning to assemble the box.


Assembling the shelves:
Using 1/4 inch seam, I stitched a long side of one shelf, to the long side of a strip.  I did the other side before adding a strip and shelf to the first side again. I continued sewing strips and shelves together till I had 7 shelves.

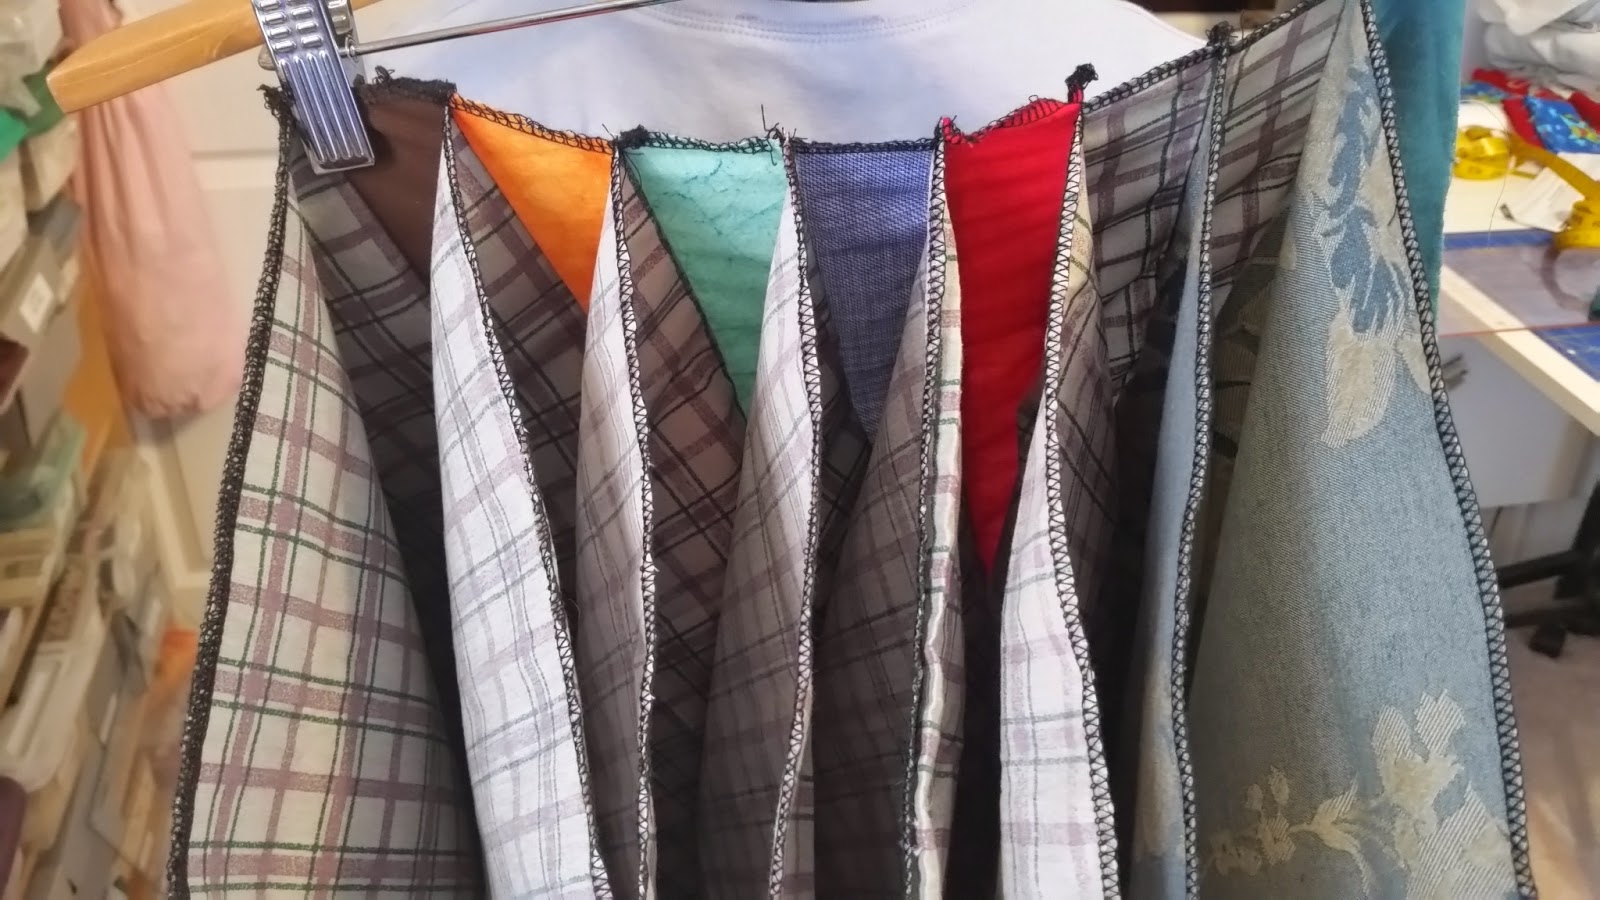
Once the shelves and strips were in place, I added another rectangle on the top and bottom shelf to make a pocket for foam board.  The foam board would hold the form of the box and were slid into place from the back..  The seams are on the outside.  The sides also got a second layer of fabric so foam board could be slid in from the back.  Only the top and bottom foam boards are kept in place with a closed seam in the back.  The foam board in the sides can be removed to move and store the box flat.


I didn't give the dimensions of the foam board, but once your box is together, you can cut them to fit.  They will be slightly bigger than 12 x 18 - probably about 11.5 x 18.5.  Cut a piece of cardboard for a test and then cut the rest to match.

I realized at this point that a back needed to be created to support the box and tabs to attach them to the sides and top.

Tabs:
I cut three strips of fabric  3x 10.  I folded each in half, short sided together, and made three straps.  I sewed the long sides together and kept the short side open for turning.  Once turned right side out, I made a buttonhole near the folded edge of each tab.  You can add the tabs to the sides of one 13 x 19 piece so that they will wrap around the sides and top of the box.

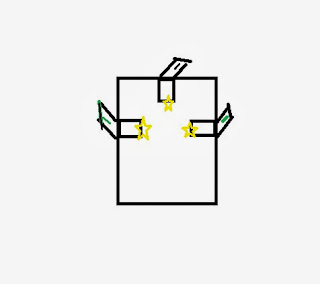
The diagram below attempts to explain what I was doing.  The stars show where I stitched the tabs to the back, while the green lines are the buttonholes.


Back:
Fold the tabs toward the center and with right sides together, sew another 13 x 19 piece to the piece with the tabs.  Leave one short side open.  Turn it right side out and slip a piece of foam board between the two layers.  Using a zipper foot, stitch the foam board into the back panel.

I'm not sure how I attached the back to the bottom.  I may have used a glue gun.

At this point, you have foam board in the top, bottom and back.  Slip foam board into the sides and use a chalk marker or fabric marker to mark on the top and sides where buttons need to be sewn to secure the back to the top and sides.  Sew any type of button to the top  and two sides so the back can be buttoned in place.

Slip a sheet of corrugated cardboard onto each shelf.  This will prevent the paper from bowing down and resting on the shelf below.

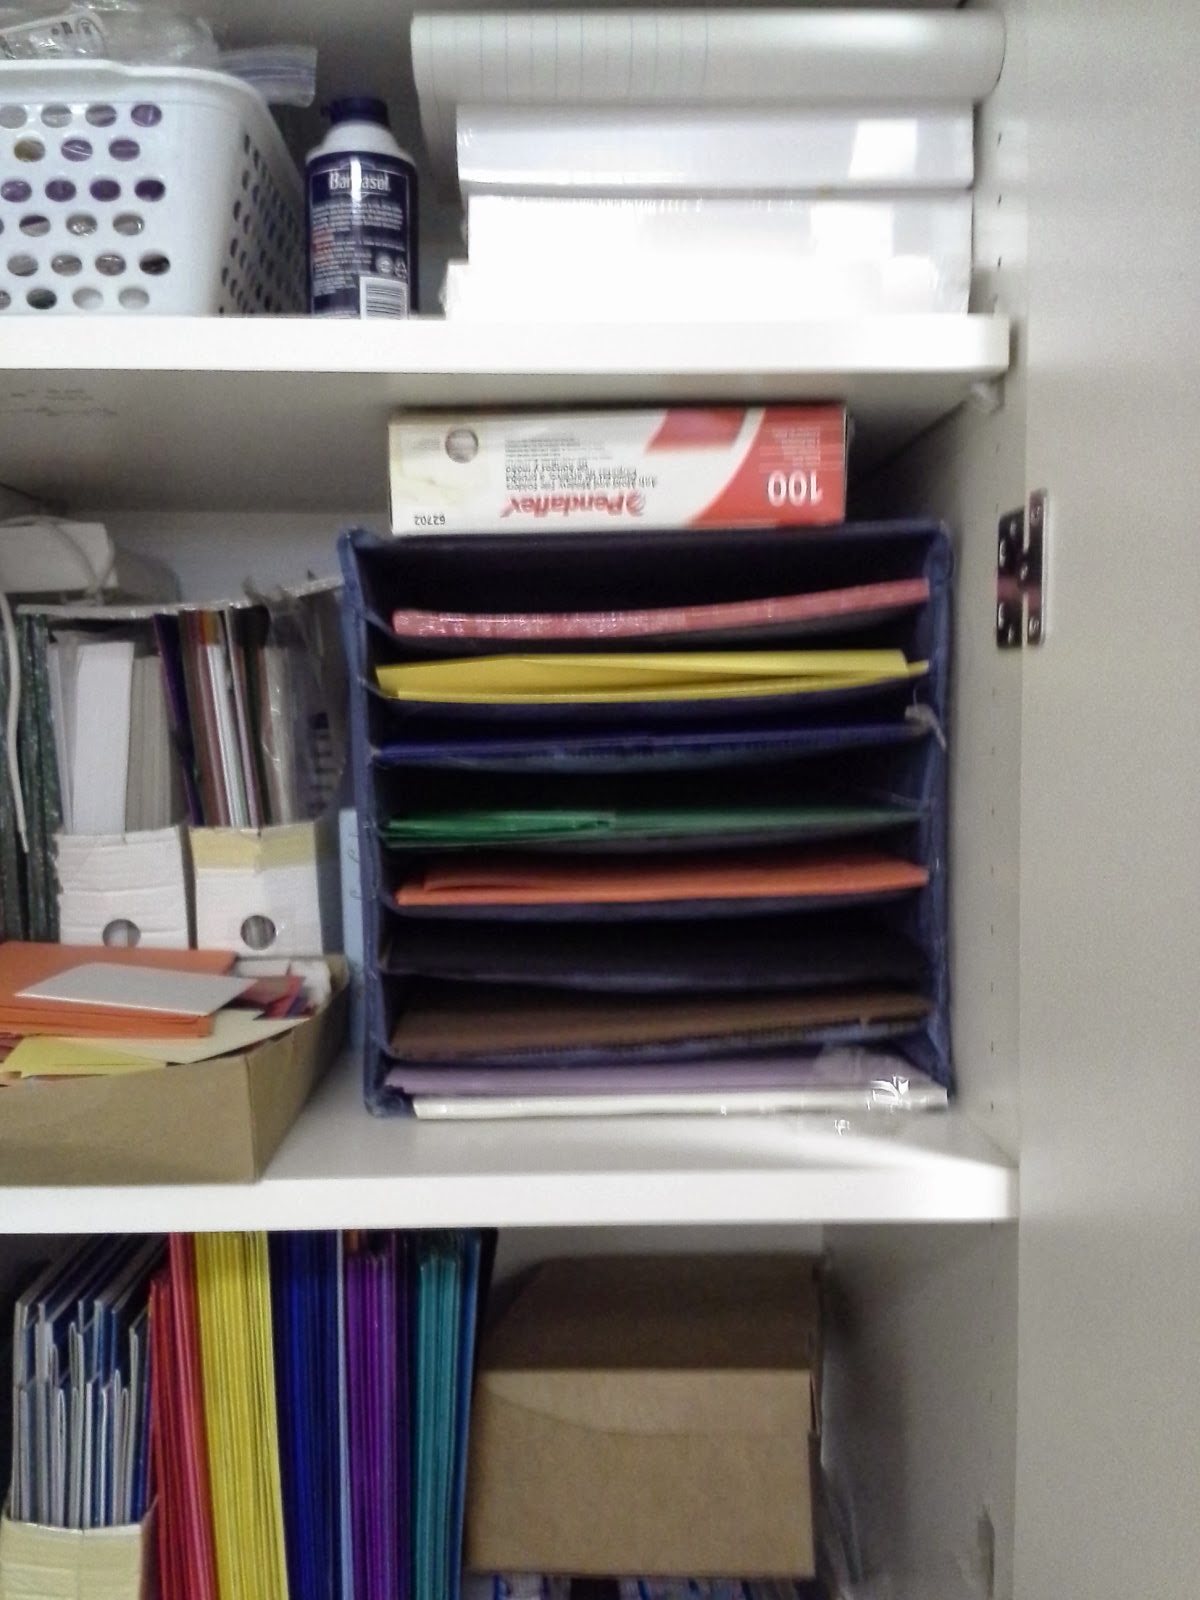
You're now ready to sort out your colored paper and use your paper rack.

Update:
I found another teacher in grave need of my homemade paper rack and have just completed it.  I found that instead of making tabs to secure the back to the rest of the rack, I just made ties with tabs.  The tabs made it easier to give and extra amount of attachment for the cord to the fabric.


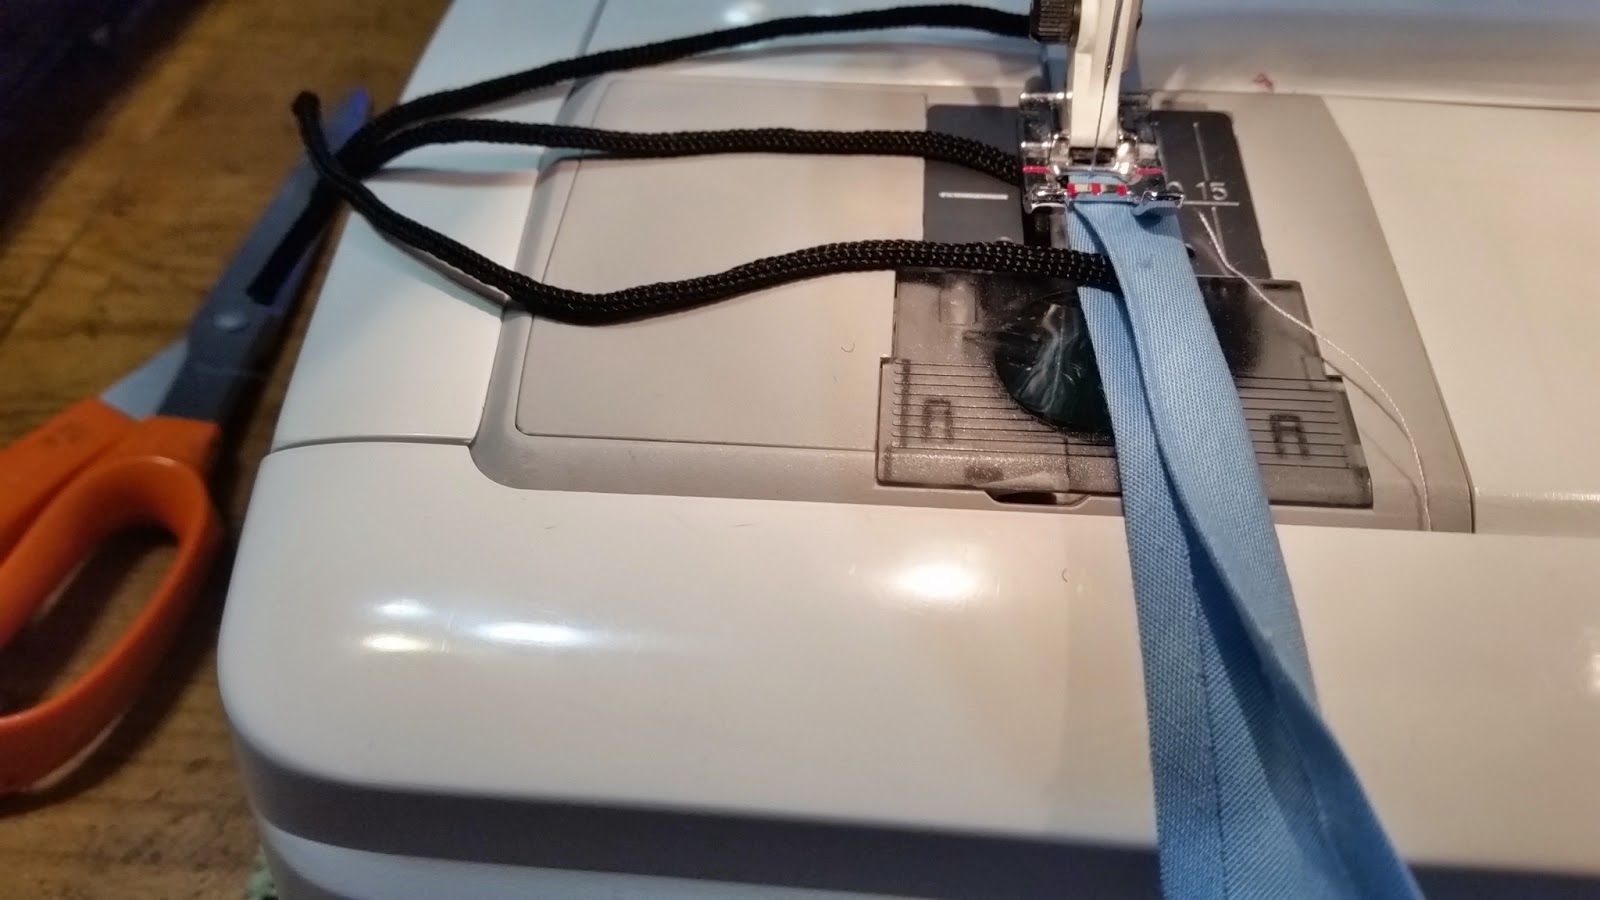
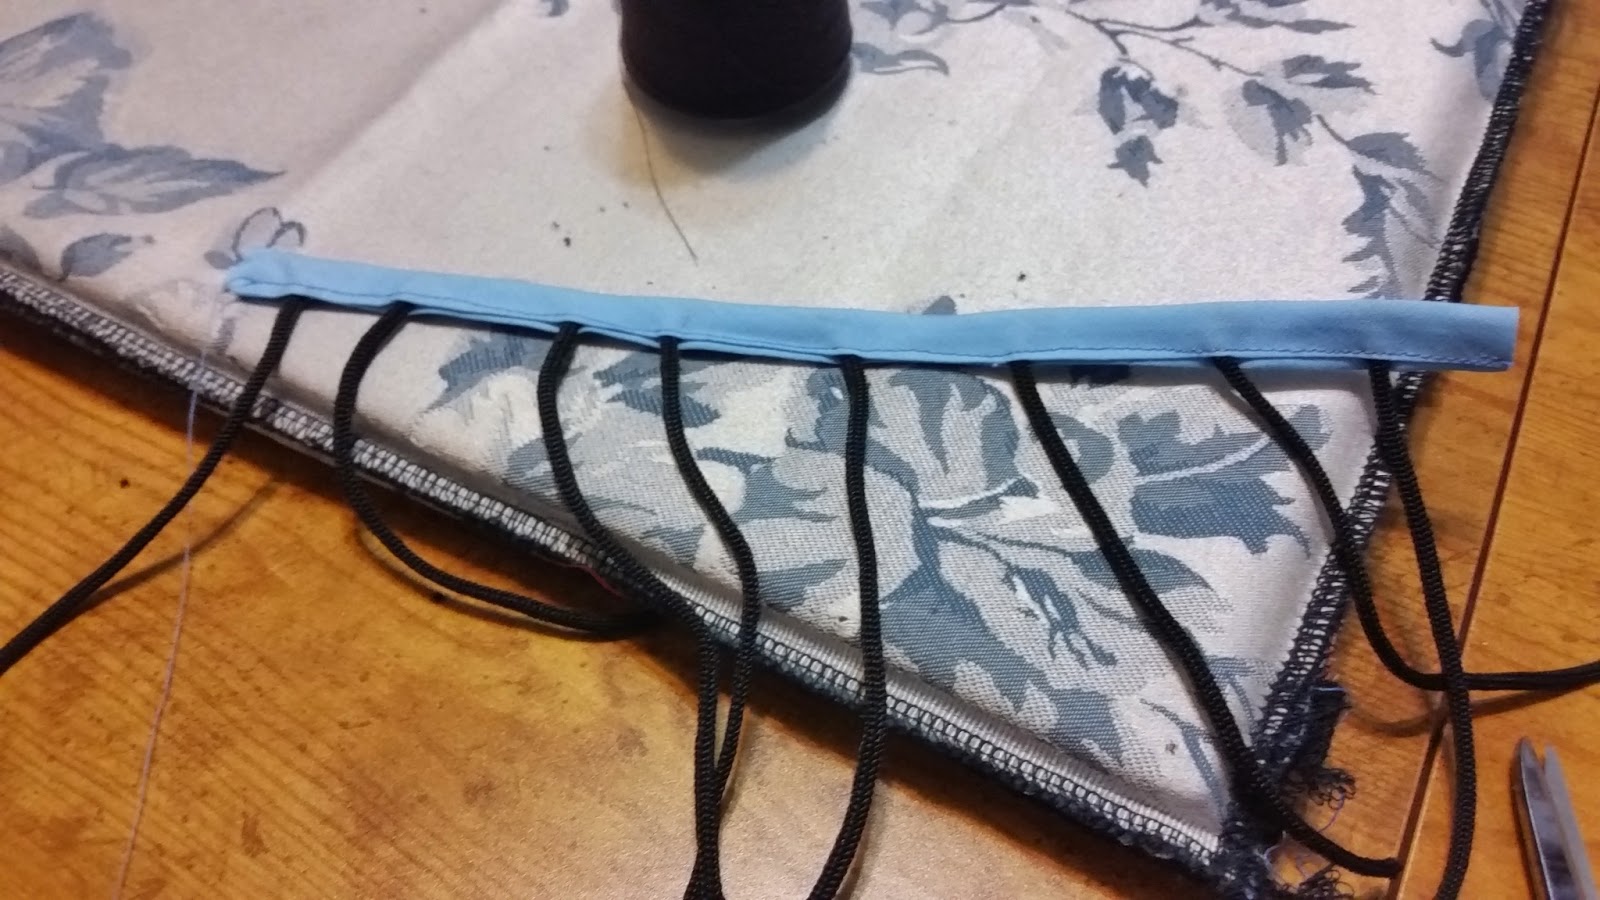
I sewed 5 inch cords between wide bias tape and then cut the tape between the cords.  One cord was hand sewn to the corners and in the sides with another cord opposite it.  I even added safety pins between the cords to add strength.  I could sew the whole thing together, but this makes it possible to fold the rack up if it needs to be moved or for storage.


DIY Pirate Boots


I really needed a pair of  boots to finish my costume for a Disney Cruise later this year.  With Halloween later this month, I figured I'd get extra use out of the costume if I got it made now.  My costume consists of  a skirted bottom from an old bathing suit, textured nylons, a striped shirt and a fantastic pirate hat I found in Disneyland Paris last summer.  The shoes were the missing piece of the puzzle.  I found a few  directions for making shoe covers to make it look like you were wearing pirate boots, but none of the directions were really clear.  With a bit of trial and error, I ended up with a pretty cool set of "boots".   Hopefully, these directions will be more helpful than what I found.

You will need:
large sheet of paper (I used freezer paper) for a pattern
a yard of black felt or pleather - (pleather is a vinyl used for clothing, not the heavier stuff used for upolstery or cushions)
matching thread
black elastic  - 2 pieces of narrow elastic about 6 inches long (I have a size 5 shoe so you may want to add a bit to that estimate) and 2 pieces wide elastic (3/4 to and inch wide) enough to go around your leg at whatever height your boots will reach.  (My boots go over my knee, so I needed 2 pieces - 16 inches long)
scissors
leather needle for sewing machine if using pleather
plastic foot for sewing on vinyl if using pleather
black shoes or boots
4 pinch clothespins or clips  (you don't want to use pins to secure pleather since it could leave holes)

I had the perfect pair of black slip-on shoes in my closet.  They even have a silver buckle on the side.


While wearing one shoe, I put a sheet of freezer paper on the floor, rested my leg on the paper, and traced around my leg.  Where the shoe and foot met.  I  and made a rough sketch of where I wanted the fabric to overlap the shoe.  I added two inches on either side of the traced leg and ended up with a pattern that looked like this.


I opted to cut out my first design on felt just to see if the fit was what I aiming at and to see if I would be satisfied with felt rather than usng a fabric that looked more like leather.  It was OK, but not as impressive as I was hoping.

Initially my pattern was only an inch wide on each side, and that resulted it not enough "give" to get it on and off.  Since I only used 1/4 seam allowance, there was no room for expanding my design so I had to recut my pattern and my felt. 

 My second felt cutout, with a 2 inch additon on each side, was much better.  Truth be told, I cut the felt a little generous around the pattern.   If you want to add some detailing on the center front seam, you may want to even add an extra 1/4 inch on the front of the boot so you can sew a deeper seam than 1/4 inch.  To add detail, sew the front seam first.  Lay the two pieces open, right sides up, and add the top stitching, on each side of the seam.   Put the right sides back together and  sew the back seam.

Turn the shoe cover right side out and try on with the shoe for fit and to see how much to trim away where the cover and the shoe meet.  I purposely left a lot of fabric near the shoe when I made my pattern since I was unsure of where I wanted it to hit.  You can cut fabric away, but you can't add it if you don't give yourself some adjustment room.  My aim was to make the fabric overlapp at the heel about 1/2 inch, and then lay flat across the top of my arch.  You want it to over-lap, but not so much that it hits the floor.

When your shoe cover fits the way you want, place the boot cover, wrong side out on top of another piece of freezer paper.  Draw a trapazoid  (rectangle with a shorter top than bottom).  The top of the trapazoid will be the same width as the top of the shoe cover, but the sides will flair out about 1 1/2 inches on each side.  It will be about 5 inches tall and will look like this.


If you want your cuff lined to give it some body, you will need to cut a total of 4 cuffs (2 for each boot)

With right sides together, stitch two of the trapazoids together along the sides.  Do the same for two more to make the lining.   With right sides together, sew the cuff and the lining together at the bottom of the trapazoid.  Turn the cuff so that the wrong sides are together.

Make sure the open edges of the cuff are even.
Place the cuff inside the shoe cover.
Using clip clothes pins, secure the raw edges of the cuff to the top raw edge of the shoe cover.
Match the seams on the shoe cover to the seams of the cuff.
Sew all layers together.

Turn the cuff to the outside of the boot.

Take one of the shorter pieces of elastic and make a strap that goes under your shoe and attaches to the shoe cover on the inside and outside of the shoe cover.  This will  hold the shoe cover in place.  Sew or glue the elastic to each side.


Use one of the larger pieces of elastic to make a loop to go around your leg.  It needs to be tight enough to hold up the boot, but not so tight that you cut off the circulation in your leg. I only had white on hand when I was working on the boot covers, but replaced the white elastic with black just because I wanted to make sure that it really didn't show.  The cuff hides it well, but I wanted to make sure it was pretty much invisible.

Match the raw edges of the elastic, and sew across.  You could overlap the elastic and sew the ends, but by making a seam, you can easily sew another seam across the elastic if you find the loop is too loose.  When you put the elastic on, just keep the "seam" on the inside of the circle.

Now slip on the boot cover, put on your shoe and pull the elastic loop over the boot and up to the top of the seam where the cuff is attached.  Fold over the cuff to hide the elastic.


If everything fits as you planned, then remove the boot cover, and sew a strip of narrow elastic onto the boot cover so that it runs under the shoe.

To put on the shoe and boot cover, slip on the boot cover, slide the shoe onto your foot, and pull the narrow elastic under the shoe.  Now add the wide elastic under the cuff.

Thursday, October 10, 2013

Another Disney Fish Extender

Yes, I know.  I seem to be in a rut, but another friend needed a fish extender for her Disney cruise and who was I to refuse.  Besides that, I can not find the fish extender I made for our cruise earlier this year.  It's definitely in a really safe place.

I don't charge for anything that has a Disney design on it because I am a firm believer in not infringing on copyrights, but I'm not immune to accepting a gin and tonic as thanks.  I have noticed that there are fish extenders being sold on various internet sites with prices between $40 and $60.  I am severly underpricing my crafting skills.  LOL

As for my recent fish hangers, I have learned to put the pleate away from the edge so it's easier to apply the seam binding.  I have cleaned up my flags as well.  They may not be all the same width, but making them the same height made putting them in a straight line a lot easier.


Wednesday, August 21, 2013

Zippered Bag

I've become addicted to making zippered bags; make-up, pencil, electronics...whatever.

I recently made a set of three zippered bags to donate to an auction for a horse riding academy.  I was actually looking for a heavy-duty yet sheer fabric like that which was used to make a 2-set bag I bought years ago from where I don't recall.  JoAnn Fabrics did sell this black fabric.  It's actually used for speakers, but when held up to light, you can sort of see what is inside the bag.  It makes going through security at airports a little less invasive - if they pull your bag out of the scanner to have a better look; exactly what happened to me recently.

The smallest bag pictured is about the size of a pencil case. 

Cut two pieces of fabric: 1 - 12 x 4
                                         1 - 12 x 6
use a matching 9 inch zipper and thread
Cut 2 - 3x2 inch pieces of fabric that are complimentary or matching to the bag fabric


Place one 3x2 inch fabric, right side down, near the end of the zipper.  Stitch in place about 1/8 from the zipper stop.  Then top stitch in place.  The end result will have a piece of fabric a bit longer than the zipper.  By adding this piece, you have a safe seam allowance when sewing the side of the bag.

Do the same at the other end of the zipper.

Take the 12x4 piece of fabric to use as the top of the bag.  If you plan to decorate it in any way, now would be the time to do it.

Place the zipper, right side down, along the top edge of the front of the bag.  Match the end of the fabric to the edge of the bag. Using a zipper foot, stitch the zipper in place.  To begin stitching, you can have the zipper open.  When you get about mide way down the zipper, keep the needle down, and carefully lift the zipper foot to CLOSE the zipper.  Lower the foot, and continue sewing to the end of the zipper.

Turn the zipper to the right side.  Fold the fabric down, and top-stitch the zipper.

Take the back (12x6), right side up, and place the zipper, right side down, on the top edge.  Match the fabric end to the edge of the fabric tab that you attached to the zipper.  Stitch the zipper to the top.  Since you are now starting at the opposite end of the zipper, you can stitch across the zipper and fabric till you get almost to the end.  When you are near the end, leave the needle down, raise the foot, and carefully open the zipper past where you have just stitched.  Continue stitching the zipper to the very end.

Open the zipper and back so that the zipper is right side up.  Fold the back down along that seam you just made attaching the zipper, and top stitch the back down as you did for the front.

Since the back is deeper than the front, when you match the bottom edges of the front and back, the zipper will go across the front of the bag and not right across the top.  It's easier to stitch the sides this way.

With the zipper open,  stitch the sides and bottom, right sides together.  (If you don't remember to open the zipper, you'll have quite a time trying to open the zipper so you can turn it right side out.

 As you can see from the photo below, the extra piece of fabric, that is stitched to each end of the zipper, allows you to stitch the sides without getting too close to the zipper.  Sweet!

Thursday, June 13, 2013

Saving a Bathing Suit


Most women know how difficult it is to find a good bathing suit, so it's heartbreaking when that great suit starts to die too early.  I bought a great, teal, one piece suit a couple of years ago.  Last year I decided that it had to be retired because the elastic was decaying.  I put it in my rag box since the fabric was still good and Barbie may need a new bathing suit one day.  Well, this week I started to miss that suit and wondered what I'd done with it.  Sure it enough, it was still in the rag box and Barbie hadn't cut it up for a new suit.  After trying it on, I remember why it was in the rag box, and noticed that I'd tried to replace the elastic on one leg already.  My first attempt was not pretty nor effective.  After some research on the Internet for the best way to attach elastic in a bathing suit, I removed the old elastic from one leg and tried a different method.  Actually, I combined two methods that I'd found on Youtube.  The first video showed to add the elastic to the wrong side of the fabric with a zig-zag stitch, then stitch again using a straight stitch, but still sewing from the wrong side.  The second video sewed both steps from the right side.  I decided to do half and half; attach the elastic with a zig-zag from the wrong side, fold over the elastic, and sew a straight stitch from the right side.  I'm really pleased with the results and expect to get at least one my season of wear out of the suit.  I'll add photos when I replace the elastic around the neckline and straps.


Elastic that was replaced in the leg openings. 


Leave a couple of inches of elastic at the beginning to hold onto when starting to stitch.  You can see the extra elastic to the left of the clothes pin and where I started to stitch to the right of the clothes pin.


Place the elastic about 1/8 of an inch from the edge, on the wrong side of the fabric.  Using a wide zig-zag stitch, hold the elastic with both hands (one in the front of the elastic as it goes under the foot, and one behind the foot), pulling the elastic slightly as you stitch.  The right side of the needle should fall just off the fabric so that the fabric is pulled over the edge of the elastic.


Trim off the extra elastic at the beginning and stitch to meet the beginning.  The edges of the elastic butt together, but do not overlap.  Zig-zag over the elastic where they meet.


Fold the elastic to the wrong side of the fabric and stitch through all layers with a straight stitch, pulling the elastic slightly as when it was attached to the fabric.  Sorry that I couldn't show the fabric being stretched as I stitched.  I don't have a way of taking a picture while holding the fabric.
The elastic will function well, but I should have waited to purchase a narrower elastic for the top.  It's a bit too wide at the shoulder and I didn't have enough room to remove the armhole elastic and replace it as well which makes the strap bubble at the top.  Patience is a virtue.


Thursday, June 6, 2013

What have I been doing?

I haven't needed to add anything to the blog for ages since everything I've been working on was originally created by someone else.  I am trying to build up a supply of items to sell at our annual craft show at church.  I've missed the craft show two years in a row, so hopefully it won't be held when I'm not available.  At any rate, I'm sewing up a storm of wristlets, cell phone holders, mug rugs, and covered hangers.  After about 8 wristlets, I'm finally getting to the point where it doesn't take me all day to stitch it out.  In fact, I've even improved on the design so the edges are all finished off on the inside.