Search This Blog

Thursday, March 29, 2012

Fish Extender


Disney fans are famous for decorating their hotel rooms and campgrounds, so it seems logical that on a cruise, they'd find some way to decorate their cabin doors.  This one is a prototype for a set that I may be making for guests taking a Disney cruise in January 2013 on the Disney Dream.

Fish Extenders get their names from the fish-shaped hook that is outside cabin doors.  They are initially used by the crew to leave messages, but of course, Disney fans can't just have a hook.  Besides a place for messages, passengers also leave surprise gifts for friends and family.  In case you're interested, this one measures  about 15 5/8 by 8 inches.  My original design was for one much larger, but I noticed from pictures on Google, that the space, in which the fish extender would hang, is not very big.


Our name using nautical flags.


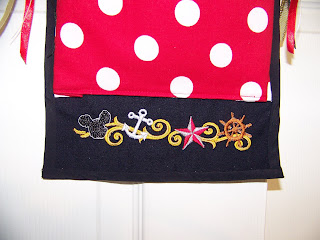
The base, made of black denim, is 17 1/2" x 8".  The pockets are rectangles (11.5" x 10"),  interfaced, and  sewed into 5 inch tubes.  I sewed the edges if each pocket even with the edge of the base.  Since the tube is much longer than the base, I made a pleat about 1/2 inch from the edge so that the bias strip I used to finish the edge, did not catch the pleat.  

I surged the top edge, and folded it over 1 1/2 inches to make the pocket for the rod from which to hang it.  The rod was a small dowel rod with wooden balls glued on.  Of course the rod was too wide for the smaller balls I wanted to use, and was too small for the larger balls I had on hand.  Several layers of duct tape wrapped around the dowel rod before attaching the balls solved that issue.

The bias strips to finish the edges were 1 1/2 inch wide.

I couldn't find white ribbon with red polka dots.  Instead I used plain white ribbon and added tiny dots of red glitter paint for dots before forming the bow.  Works for me!

Friday, March 16, 2012

Plush Grocery Bag Holder

Plastic Grocery Bag Holder


I have many, in the minds of most people, waaaay too many, Disney plush dolls in my sewing room.  I decided to put at least one of them to good use by making a bag holder for it.  I opted to use Minnie because I had pink fabric that would make a great “dress”.

Materials:
  • 1 piece of fabric - 18 wide by 17 inches long
  • 4 pieces of matching fabric 6 wide  x 4 ½ tall
  • Thread
  • 2 small buttons
  • 10 inches of ¼ inch elastic
  • 1 - 10 inch plush doll or animal


I drew up this pattern for the bodice.  

Cut out 4 bodices, and sew the sides together so that you have a front and a back together, and then another front and back together.  Use a ¼ inch seam allowance.

Fit one bodice inside the other, right sides together, and sew a ¼ inches seam along the arms and neckline.  Leave  the bottom of the bodice open.

Clip the curves and turn the bodice right-side out.

Sew buttonholes on the top of two of the shoulder tabs either on the front or the back of the bodice.

Making the bottom of the tube:

Starting one inch from the bottom, stitch the rectangle together to form a tube using ¼ inch seam.  Stop 7 inches from the top.

Where the tube is still open at the top and  bottom, fold the fabric over ¼ inch and stitch the fabric down.  This will form an opening into which you can enter and exit the casing for the elastic and an opening at the top into which you can put bags into the holder.

Fold the bottom to the inside, ¼ inch, press, and then fold it down again ½ inches.  Stitch along the folded edge, close to the fold.  You now have a casing for the elastic.

Thread the elastic into the casing using a safety pin to help guide you or a bodkin.  Use a safety pin to hold the elastic so it doesn’t come past the opening where you started. 

Fold a small piece of matching scrap fabric over the ends of the elastic.  Stitch in place.  Let the elastic slide into the casing.  The matching fabric will hold the ends together, but you won’t see where they were connected because the fabric matches the casing.

Using a long gathering stitch, stitch along the top of the bag, 1/4 inch from the edge.  Stitch another row of long stitches ½ inch from the edge.  Tie together the ends of all four threads at one end.  At the other end, pull two of the threads, from the same side of the fabric, to make gathers along the edge. 

Leave the bag section, right side out, and turn the bodice section inside out.  Pull the gathers to fit inside the bodice.  Adjust the gathers to fit evenly inside the bodice, and sew, all layers together, between the two rows of gathers.  If you are making this as a gift, you may want to sew the bag section to just the outside of the bodice and then turn the lining to the inside and hand stitch the lining down to cover the seam.


In several places, snip the row of stitching that is showing on the outside of the bag.  On the inside of the bag, pull the corresponding thread to the row of stitching you just snipped, and remove the extra row of gathering.


Sew the buttons to the tabs across from each button hole and you’re ready to dress your teddy bear, plush or whatever and pull them to good use.

I didn’t want to sew anything to Minnie, so I opted to just tie a string around her body, and hang her from the string.  The bodice on the dress hides the string.

Toddler Bib


I have given many bibs to new moms, but I rarely give exactly the same design more than twice.  I started out using washcloths with bias tape around the neck area and for closing.  I've also used terrycloth to make my own shapes.  These require serging the edges or using fabric to back the bib so the edges are stitched between the front and back.  Although very absorbent, I'm not sure that this wouldn't require a lot of dryer time.  So, today I tried this version.  I started with my all-time favorite, the washcloth, and just added the curved top.

I did my embroidery first.


Using a bib pattern that I found on-line years ago, I used just the top portion.  The pattern didn't quite go to the outside of the washcloth, so I just curved it out a bit and added a bit for a seam allowance.


Cut two tops, and with the right sides together, stitch the tops together.


I used a 1/4 inch seam, but I could have been a bit more generous with my seam allowance.
The pattern shows a triangle cut-out instead of just snipping around the curves.  I found that the cut-outs do work better though tedious to make.


Turn the top right side out.


Lay the front edge of the top along the top of the washcloth, right sides together.  Using 5/8 inch seam, sew just one layer of the top to the top edge of the washcloth.


Fold the top over the back, and turn the raw edge in.


Pin the back to match the front, and top-stitch to close.  I also choose to top-stitch around the whole top.


Add a strip of hook and stick tape (Velcro) to the top of one flap and the bottom of the other.


I'm not clever enough to include the pattern I used for the top.  Email me if you'd like a copy.

Tuesday, March 6, 2012

Baby Closet Organizer

This is not rocket science, but keeping up with the baby clothes that fit and those that are a bit too big....and then become too small before they even get used, can sometimes feel like something akin to rocket science.  I recently found an embroidery design that creates little disks; like those used in department stores.  I purchased the design, but deleted it in error before I got a chance to use it.  Unfortunately, the website where I found it, doesn't track purchases made while under a membership.  Since my membership was for 1 week, I was out of luck.  Floriani digitizing program to the rescue!  I think my design is actually even better than the original.  I haven't included instructions to make the organizers, but if you are interested, and have an embroidery machine, I'm willing to share my design.